Color Reduction Prints
Prints of this type are called 'reduction prints' because all of the colors needed for the print are printed in succession from a single block. More and more of the printing surface is cut away or 'reduced' after each color is printed. The open area of the block leaves the parts of the previously printed color exposed as it prints, covering the rest. Each time the printer cuts the block he is defining and shaping the color he has already printed, when a new color is laid onto the print, the previous color takes its final shape.
When the first color is printed, the number of prints in the edition is set. To print the second color, the block must be altered, which will make it impossible to reprint the first color. A printer should print extras at the beginning of the work because there are always mistakes or changes made that will cause individual prints to be discarded from the final edition.
The following illustrations will take you through the process of making a color-reduction linoleum print.
After a drawing is done the print can be planned. Planning is deciding what parts of the drawing will be different colors and then deciding on a sequence of colors as the print progresses. Each printer will work in a different way and will make decisions based on the types of ink they use, the effects of each ink's translucency or opacity, and the number of colors in the print. This will show how 'Gesture I' was printed.
| Red was first. There was no cutting as I wanted no 'paper-white' to show in the final image. |  |
| The drawing was transferred to the linoleum and the areas that were to stay red were cut out. Printed on white paper,with black ink, the block left this imrpression. |  | Printed on top of the red prints, it looks like this. | 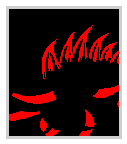 |
The next color was light blue. The block was cut again, shaping the red and black areas. Proofed on white paper the impression looked like this. |  |
Printed on top of the red and black prints, it looks like this. | 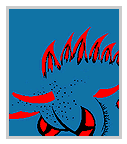 |
The next color was a yellow ochre. The block had been cut again, this time to add some sky and texture in the animals markings. |  |
This is the print so far... | 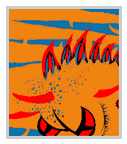 |
The next color was yellow. The block was cut to shape the ochre moons and to give the animal its final color. Here is the proof, | 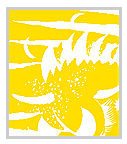 |
and here is the result. | 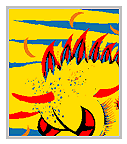 |
Next, block was cut to finally define the animal and finish the sky. The block had been reduced so much that it could be inked with two colors. Dark blue and purple finished the print |  |
And here
it is. | 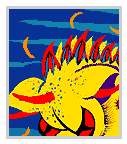 |